
This notation started as a personal thing, so that I could keep track of my experiments with different stitches.
However, the old version was starting to confuse even me,
plus I thought that I could do a communication tool that might help others, too.
So below is the notation that I developed, then revised (with help from the community).
And I’ve since revised it again (on 3-5-12).
And I’m editing it again now, in February, 2013. (This includes some nonstandard terminology for wrap overs, because I found no clear source for a standard.)
…And I’ll be continuing to revise it until I find things clear.
The return chain at the top can rotate forward and back, as you can see here.

So I’ve named my yarn bars as if the vertical ones were standing straight
and the “TopKnot” of the chain is on the top.
Shorthand for Instructions:

Yarn Bars and Spaces:

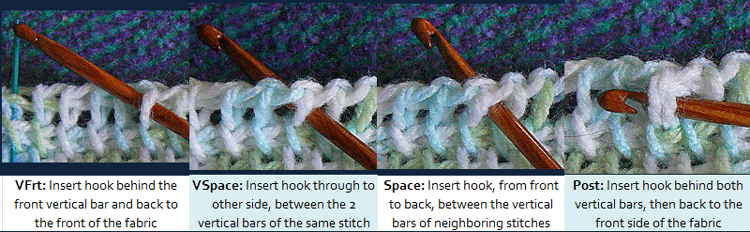
The new set of hook stroke pictures:


You can find the old version of the hook strokes at:
Older Version

tienes algun video de la puntada KFrtBar?
My Spanish is weak, but it looks like you want a video.
I have no videos, but plan to create a pattern PDF soon with good pictures, which will include the K-FrtBar stitch, which is my favorite.
Oh! I guess I haven’t checked in for a long time… this is way better than what you had before, and I thought that was already pretty good. This is GREAT!
Thanks!
It needs some work, I’ve gotten a bit behind.
It is so beautiful but looks hard to do but will give it a try and see what happens
This is great and perfectly clear !
Thank you very much for sharing ♥
Wow! Thank you! This is a very awesome resource you have created here. I’ve booked marked and am sure I’ll be back often.
Do you have anything on joining? I just finished my first Tunisian afghan (actually, my first yarn craft ever). It’s from the book “I Taught Myself to Crochet” (6397 by Boye). It’s a simple Tunisian afghan made in colored blocks of varying sizes in three panels, the center panel wider than the left and right. Each panel is first finished with a two-row border before the panels are joined; SC on the first row; DC on the second, with some decreasing stitches on the top and bottoms (though I did extended DC for my outer row because I wanted more height). The instructions on how to join the panels don’t make sense to me. Can you tell me if it’s normal to join the panels so that one panel is frontside and one panel is backside? Or am I reading it wrong?
Thank you for your comments 🙂
Some afghan patterns use both sides of the fabric because they like the contrast of the nubby texture on the backside.